Перейти до основного вмісту
Цей посібник демонструє, як використовувати моделі зображень Gemini через CometAPI за допомогою Google Gen AI SDK. Він охоплює:
  • Генерацію text-to-image
  • Редагування image-to-image
  • Композицію з кількох зображень
  • Збереження згенерованих зображень
  • Base URL: https://api.cometapi.com
  • Встановіть SDK: pip install google-genai (Python) або npm install @google/genai (Node.js)

Налаштування

Ініціалізуйте клієнт із base URL CometAPI:
from google import genai
from google.genai import types
import os

COMETAPI_KEY = os.environ.get("COMETAPI_KEY") or "<YOUR_COMETAPI_KEY>"

client = genai.Client(
    http_options={"api_version": "v1beta", "base_url": "https://api.cometapi.com"},
    api_key=COMETAPI_KEY,
)

Генерація Text-to-Image

Згенеруйте зображення з текстового Prompt і збережіть його у файл.
from google import genai
from google.genai import types
from PIL import Image
import os

client = genai.Client(
    http_options={"api_version": "v1beta", "base_url": "https://api.cometapi.com"},
    api_key=os.environ.get("COMETAPI_KEY"),
)

response = client.models.generate_content(
    model="gemini-3.1-flash-image-preview",
    contents="Create a picture of a nano banana dish in a fancy restaurant with a Gemini theme",
    config=types.GenerateContentConfig(
        response_modalities=["TEXT", "IMAGE"],
    ),
)

for part in response.parts:
    if part.text is not None:
        print(part.text)
    elif part.inline_data is not None:
        image = part.as_image()
        image.save("generated_image.png")
        print("Image saved to generated_image.png")
Структура відповіді: Дані зображення містяться в candidates[0].content.parts, які можуть містити текстові частини та/або частини зображення:
{
  "candidates": [{
    "content": {
      "parts": [
        { "text": "Here is your image..." },
        {
          "inlineData": {
            "mimeType": "image/png",
            "data": "<base64-encoded-image>"
          }
        }
      ]
    }
  }]
}

Генерація зображення із зображення

Завантажте вхідне зображення та трансформуйте його за допомогою текстового Prompt.
from google import genai
from google.genai import types
from PIL import Image
import os

client = genai.Client(
    http_options={"api_version": "v1beta", "base_url": "https://api.cometapi.com"},
    api_key=os.environ.get("COMETAPI_KEY"),
)

# Load the source image
source_image = Image.open("source.jpg")

response = client.models.generate_content(
    model="gemini-3.1-flash-image-preview",
    contents=["Transform this into a watercolor painting", source_image],
    config=types.GenerateContentConfig(
        response_modalities=["TEXT", "IMAGE"],
    ),
)

for part in response.parts:
    if part.text is not None:
        print(part.text)
    elif part.inline_data is not None:
        image = part.as_image()
        image.save("watercolor_output.png")
  • Python SDK напряму приймає об’єкти PIL.Image — ручне кодування Base64 не потрібне.
  • Не додавайте префікс data:image/jpeg;base64, під час передавання сирих рядків Base64.

Композиція з кількох зображень

Згенеруйте нове зображення з кількох вхідних зображень. CometAPI підтримує два підходи:

Спосіб 1: Одне зображення-колаж

Об’єднайте кілька вихідних зображень в один колаж, а потім опишіть бажаний результат.
Приклад вхідного колажу
Згенерований результат
from google import genai
from google.genai import types
from PIL import Image
import os

client = genai.Client(
    http_options={"api_version": "v1beta", "base_url": "https://api.cometapi.com"},
    api_key=os.environ.get("COMETAPI_KEY"),
)

collage = Image.open("collage.jpg")

response = client.models.generate_content(
    model="gemini-3.1-flash-image-preview",
    contents=[
        "A model is posing and leaning against a pink BMW with a green alien keychain attached to a pink handbag, a pink parrot on her shoulder, and a pug wearing a pink collar and gold headphones",
        collage,
    ],
    config=types.GenerateContentConfig(
        response_modalities=["TEXT", "IMAGE"],
    ),
)

for part in response.parts:
    if part.inline_data is not None:
        part.as_image().save("composition_output.png")

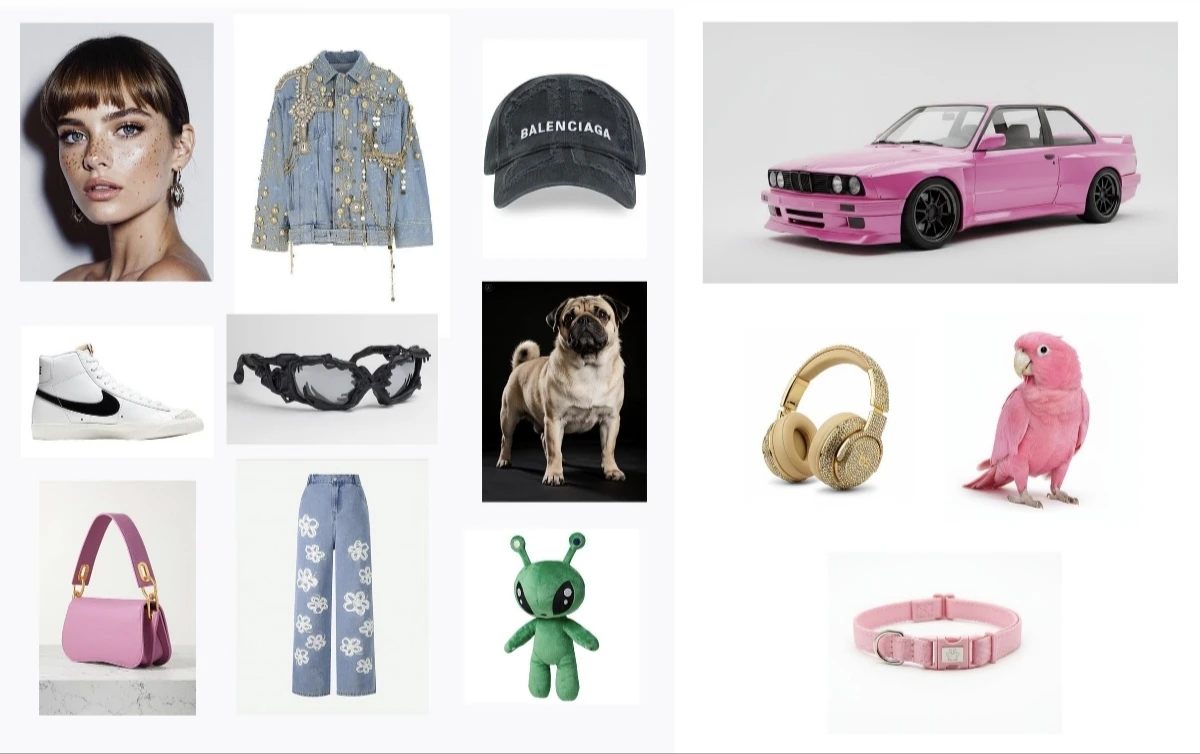
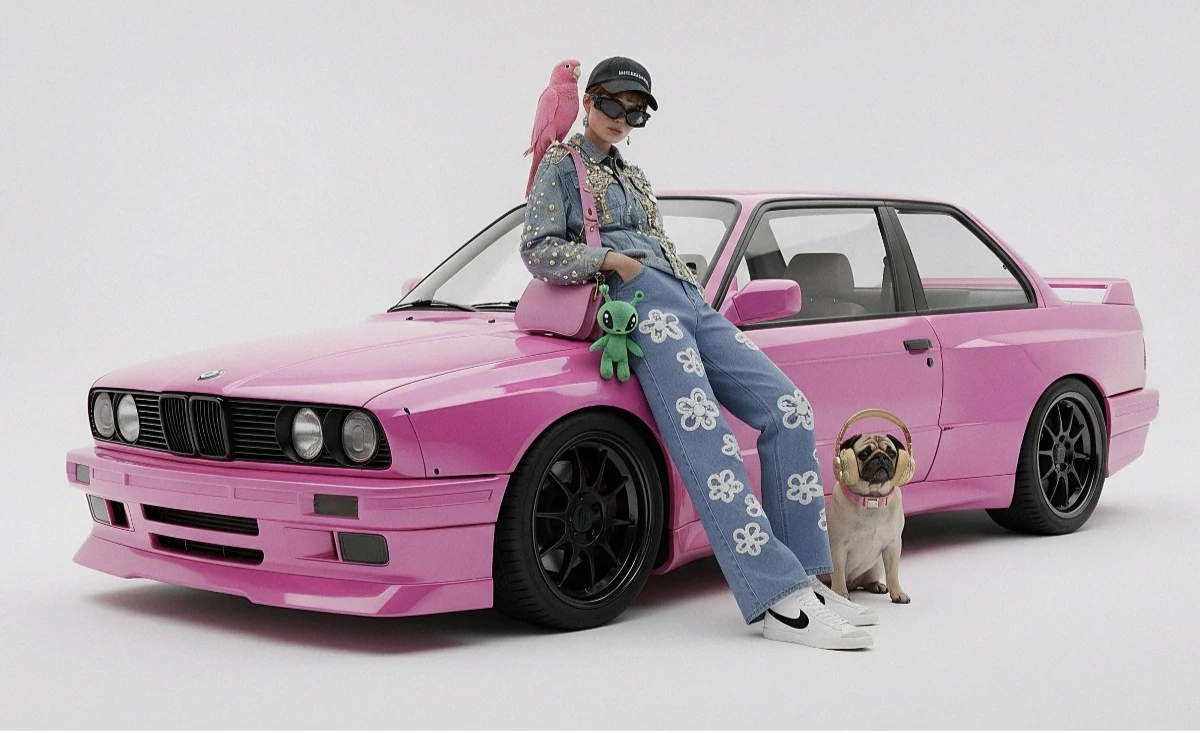
Спосіб 2: Кілька окремих зображень (до 14)

Передавайте кілька зображень безпосередньо. Моделі Gemini 3 підтримують до 14 еталонних зображень (об’єкти + персонажі):
from google import genai
from google.genai import types
from PIL import Image
import os

client = genai.Client(
    http_options={"api_version": "v1beta", "base_url": "https://api.cometapi.com"},
    api_key=os.environ.get("COMETAPI_KEY"),
)

image1 = Image.open("image1.jpg")
image2 = Image.open("image2.jpg")
image3 = Image.open("image3.jpg")

response = client.models.generate_content(
    model="gemini-3.1-flash-image-preview",
    contents=["Merge the three images", image1, image2, image3],
    config=types.GenerateContentConfig(
        response_modalities=["TEXT", "IMAGE"],
    ),
)

for part in response.parts:
    if part.inline_data is not None:
        part.as_image().save("merged_output.png")
Результат генерації з кількох зображень

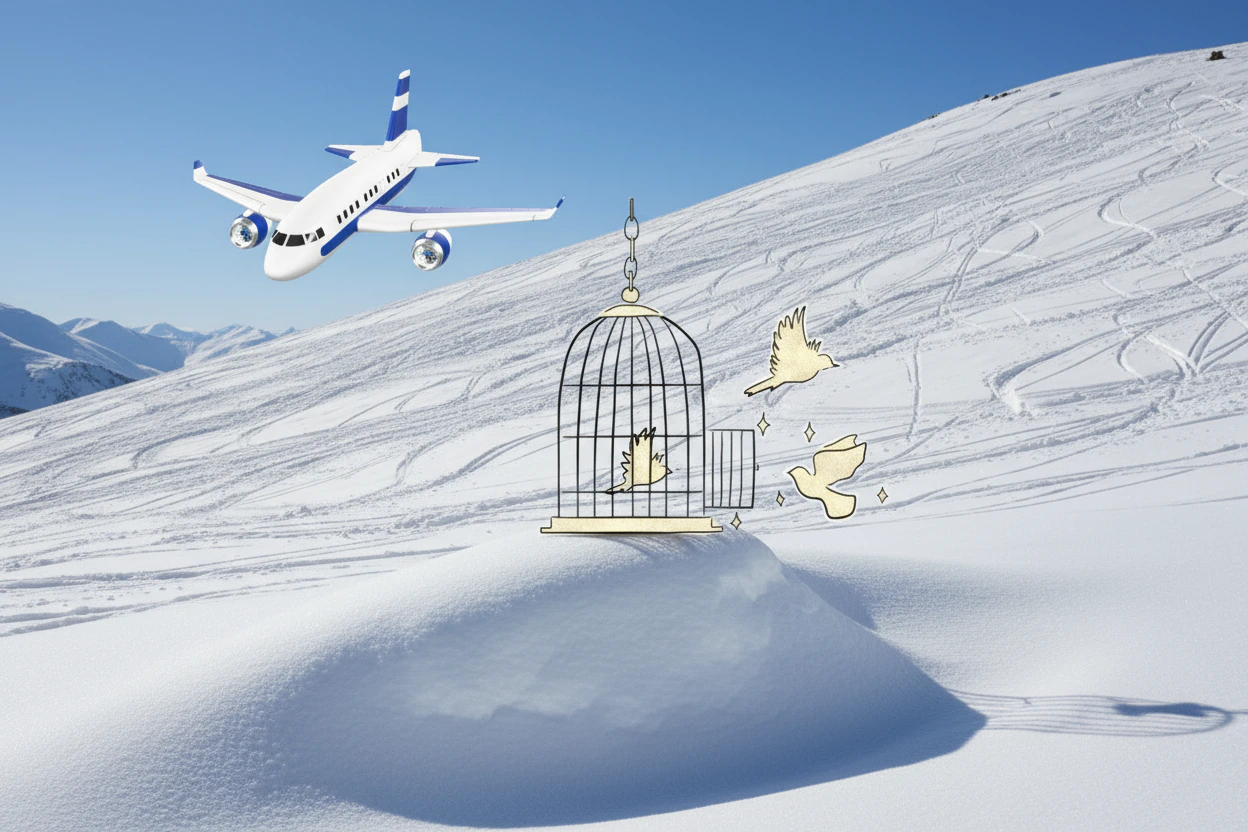
Генерація зображень 4K

Вкажіть image_config з aspect_ratio та image_size для виведення у високій роздільній здатності:
from google import genai
from google.genai import types
import os

client = genai.Client(
    http_options={"api_version": "v1beta", "base_url": "https://api.cometapi.com"},
    api_key=os.environ.get("COMETAPI_KEY"),
)

response = client.models.generate_content(
    model="gemini-3.1-flash-image-preview",
    contents="Da Vinci style anatomical sketch of a Monarch butterfly on textured parchment",
    config=types.GenerateContentConfig(
        response_modalities=["TEXT", "IMAGE"],
        image_config=types.ImageConfig(
            aspect_ratio="1:1",
            image_size="4K",
        ),
    ),
)

for part in response.parts:
    if part.text is not None:
        print(part.text)
    elif image := part.as_image():
        image.save("butterfly_4k.png")

Багатокрокове редагування зображень (Chat)

Використовуйте функцію chat у SDK, щоб покроково вдосконалювати зображення:
from google import genai
from google.genai import types
import os

client = genai.Client(
    http_options={"api_version": "v1beta", "base_url": "https://api.cometapi.com"},
    api_key=os.environ.get("COMETAPI_KEY"),
)

chat = client.chats.create(
    model="gemini-3.1-flash-image-preview",
    config=types.GenerateContentConfig(
        response_modalities=["TEXT", "IMAGE"],
    ),
)

# First turn: generate
response = chat.send_message(
    "Create a vibrant infographic explaining photosynthesis as a recipe, styled like a colorful kids cookbook"
)

for part in response.parts:
    if part.text is not None:
        print(part.text)
    elif image := part.as_image():
        image.save("photosynthesis.png")

# Second turn: refine
response = chat.send_message("Update this infographic to be in Spanish. Do not change any other elements.")

for part in response.parts:
    if part.text is not None:
        print(part.text)
    elif image := part.as_image():
        image.save("photosynthesis_spanish.png")

Поради

Укажіть ключові слова стилю (наприклад, “cyberpunk, film grain, low contrast”), співвідношення сторін, об’єкт, фон, освітлення та рівень деталізації.
Під час використання raw HTTP не додавайте префікс data:image/png;base64, — використовуйте лише raw рядок Base64. Python SDK обробляє це автоматично за допомогою об’єктів PIL.Image.
Установіть "responseModalities" у ["IMAGE"], щоб гарантовано отримати зображення без тексту.
Докладніше дивіться в API Reference. Офіційна документація: Gemini Image Generation